Matrix 是一种开源的去中心化通信协议,广泛用于即时通讯和团队协作。
Synapse 是 Matrix 的官方个人服务端实现,Element 则是其强大的 Web 客户端。
借助 HestiaCP,我们可以轻松地在服务器上安装和管理这些服务。本文将引导您在 HestiaCP 环境下安装配置 Synapse 和 Element,实现一个属于自己的开源聊天服务器。
安装 Element Synapse
安装 Docker 环境

配置 Docker Compose
在 HestiaCP 中新建网站,配置ssl,新建数据库的操作就不再赘述了。如果你是第一次看到 HestiaCP 系列教程,请点击下方链接,就能看到完整的一系列教程了。

如果你打算使用 HestiaCP 的备份与恢复功能,可以将 Docker Compose 文件和持久化存储设置在网站目录下。接下来我们就以这种方式进行演示。
我们在 /home/user/web/domain/public_html/ 目录下创建一个 docker-compose.yml 文件。内容参考如下:
version: "3.3"

services:
  synapse:
    image: "matrixdotorg/synapse:latest"
    container_name: "element_Synapse"
    restart: unless-stopped
    ports:
      - 8008:8008
    volumes:
      - /home/user/web/domain/public_html/synapse_data/:/data
    environment:
      UID: 1011
      GID: 1011
      TZ: Asia/Shanghai
- 自行修改UID,挂载路径等
生成配置文件
为了生成一个有效的配置文件,需要指定SYNAPSE_SERVER_NAME和SYNAPSE_REPORT_STATS环境变量的值,并挂载一个docker卷来存储配置。同时为了避免权限问题,还需要指定UID和GID。例如:
docker run -it --rm \
    --mount type=bind,src=/home/user/web/domain/public_html/synapse_data,dst=/data \
    -e SYNAPSE_SERVER_NAME=domain \
    -e SYNAPSE_REPORT_STATS=yes \
    -e SYNAPSE_HTTP_PORT=8008 \
    -e UID=1011 \
    -e GID=1011 \
matrixdotorg/synapse:latest generate- 自行修改UID,挂载路径等
修改配置文件
请参考:
# Synapse 的配置文件。
#
# 这是一个 YAML 文件:请参见 [1] 获取快速入门。特别注意
# 缩进非常重要:列表或字典中的所有元素都应该具有相同的缩进。
#
# [1] https://docs.ansible.com/ansible/latest/reference_appendices/YAMLSyntax.html
#
# 想要了解更多关于如何配置 Synapse 的信息,包括每个选项的详细说明,
# 请参阅 docs/usage/configuration/config_documentation.md 或
# https://element-hq.github.io/synapse/latest/usage/configuration/config_documentation.html

# 服务器名称:这是 Synapse 服务器的主机名(域名)。
server_name: "xx.com"

# PID 文件:存储 Synapse 进程 ID 的文件路径。
pid_file: /data/homeserver.pid

# 监听器配置:定义 Synapse 如何监听客户端请求。
listeners:
  - port: 8008  # 监听的端口号
    tls: false  # 是否启用 TLS(在此配置中为禁用)
    type: http  # 监听类型:HTTP
    x_forwarded: true  # 是否支持 X-Forwarded-For 头,允许代理使用
    resources:
      - names: [client, federation]  # 支持的资源类型:客户端和联邦
        compress: false  # 禁用压缩

# 数据库配置:配置数据库类型及连接信息。
# 这里使用PostgreSQL数据库

database:
  name: psycopg2
  args:
    user: xxxx
    password: xxxxxx
    dbname: xxxxx
    host: 172.17.0.1
    cp_min: 5
    cp_max: 10
    # ... 和上文相同

    # 空闲后多少秒 TCP 应向服务器发送 keepalive 消息
    keepalives_idle: 10

    # 如果 TCP keepalive 消息未被服务器确认,重传的时间间隔(秒)
    keepalives_interval: 10

    # 在客户端认为与服务器的连接断开之前,允许丢失的 TCP keepalive 消息次数
    keepalives_count: 3


# ------------------------------------------------
# 这部分使用生成后的默认内容就行,保持不变,不用修改。部分敏感信息防止泄漏用x代替
# 日志配置:配置日志文件路径。
log_config: "/data/xxx.com.log.config"

# 媒体存储路径:存储上传的媒体文件的位置。
media_store_path: /data/media_store

# 注册共享密钥:用于注册过程中验证的密钥。
registration_shared_secret: "xxxxxxxxxxxxxxxxx"

# 是否报告统计信息:是否将统计信息发送给 Synapse 团队。
report_stats: true

# Macaroon 密钥:用于生成 Synapse 访问令牌的密钥。
macaroon_secret_key: "xxxxxxxxxxxxxxxxx"

# 表单密钥:用于保护表单数据的密钥。
form_secret: "xxxxxxxxxxxxxxxxx"

# 签名密钥文件路径:存储签名密钥的文件路径。
signing_key_path: "/data/xxxxxxxxxxxxxxxxx.signing.key"

# 受信任的密钥服务器:定义可以信任的其他 Matrix 服务器。
trusted_key_servers:
  - server_name: "matrix.org"  # 受信任的服务器:matrix.org

# vim:ft=yaml
# ------------------------------------------------
其他请参考
创建管理员账户
运行后,通过register_new_matrix_user创建一个用户。
调用脚本:
docker exec -it xxxxxxx register_new_matrix_user http://localhost:8008 -c /data/homeserver.yaml -a -u user -p pass- xxxxxxx:改为自己的容器名
- user:改为管理员用户名
- pass:改为自己的密码
反向代理
下面是调整后的参考模版:
tpl
server {
	listen      %ip%:%proxy_port%;
	server_name %domain_idn% %alias_idn%;
	error_log   /var/log/%web_system%/domains/%domain%.error.log error;

    location ~ ^(/_matrix|/_synapse/client) {
        # note: do not add a path (even a single /) after the port in `proxy_pass`,
        # otherwise nginx will canonicalise the URI and cause signature verification
        # errors.
        proxy_pass http://localhost:8008;
        proxy_set_header X-Forwarded-For $remote_addr;
        proxy_set_header X-Forwarded-Proto $scheme;
        proxy_set_header Host $host;

        # Nginx by default only allows file uploads up to 1M in size
        # Increase client_max_body_size to match max_upload_size defined in homeserver.yaml
        client_max_body_size 50M;

    # Synapse responses may be chunked, which is an HTTP/1.1 feature.
    proxy_http_version 1.1;
    }
}
stpl
server {
    listen      %ip%:%proxy_ssl_port% ssl;
	server_name %domain_idn% %alias_idn%;
	error_log   /var/log/%web_system%/domains/%domain%.error.log error;


    # For the federation port
    listen 8448 ssl default_server;
    listen [::]:8448 ssl default_server;

	ssl_certificate     %ssl_pem%;
	ssl_certificate_key %ssl_key%;
	ssl_stapling        on;
	ssl_stapling_verify on;

    location ~ ^(/_matrix|/_synapse/client) {
        # note: do not add a path (even a single /) after the port in `proxy_pass`,
        # otherwise nginx will canonicalise the URI and cause signature verification
        # errors.
        proxy_pass http://localhost:8008;
        proxy_set_header X-Forwarded-For $remote_addr;
        proxy_set_header X-Forwarded-Proto $scheme;
        proxy_set_header Host $host;

        # Nginx by default only allows file uploads up to 1M in size
        # Increase client_max_body_size to match max_upload_size defined in homeserver.yaml
        client_max_body_size 50M;

    # Synapse responses may be chunked, which is an HTTP/1.1 feature.
    proxy_http_version 1.1;
    }
}
安装 Element Web
配置 Docker Compose
在 HestiaCP 中新建网站,配置ssl,新建数据库的操作就不再赘述了。如果你是第一次看到 HestiaCP 系列教程,请点击下方链接,就能看到完整的一系列教程了。

如果你打算使用 HestiaCP 的备份与恢复功能,可以将 Docker Compose 文件和持久化存储设置在网站目录下。接下来我们就以这种方式进行演示。
我们在 /home/user/web/domain/public_html/ 目录下创建一个 docker-compose.yml 文件。内容参考如下:
version: "3.3"

services:
  element-web:
    ports:
      - '9999:80'
    volumes:
      - /home/user/web/domain/public_html/config/config.json:/app/config.json
    image: vectorim/element-web
    restart: unless-stopped
修改配置文件
我们在/home/user/web/domain/public_html/config/下新建一个配置文件config.json,然后写入以下内容:
{
    "default_server_name": "matrix.org",
    "default_server_config": {
        "m.homeserver": {
            "base_url": "https://matrix-client.matrix.org"
        },
        "m.identity_server": {
            "base_url": "https://vector.im"
        }
    },
    "brand": "Element",
    "integrations_ui_url": "https://scalar.vector.im/",
    "integrations_rest_url": "https://scalar.vector.im/api",
    "integrations_widgets_urls": [
        "https://scalar.vector.im/_matrix/integrations/v1",
        "https://scalar.vector.im/api",
        "https://scalar-staging.vector.im/_matrix/integrations/v1",
        "https://scalar-staging.vector.im/api",
        "https://scalar-staging.riot.im/scalar/api"
    ],
    "bug_report_endpoint_url": "https://element.io/bugreports/submit",
    "uisi_autorageshake_app": "element-auto-uisi",
    "show_labs_settings": false,
    "room_directory": {
        "servers": ["matrix.org", "gitter.im"]
    },
    "enable_presence_by_hs_url": {
        "https://matrix.org": false,
        "https://matrix-client.matrix.org": false
    },
    "terms_and_conditions_links": [
        {
            "url": "https://element.io/privacy",
            "text": "Privacy Policy"
        },
        {
            "url": "https://element.io/cookie-policy",
            "text": "Cookie Policy"
        }
    ],
    "posthog": {
        "project_api_key": "phc_Jzsm6DTm6V2705zeU5dcNvQDlonOR68XvX2sh1sEOHO",
        "api_host": "https://posthog.element.io"
    },
    "privacy_policy_url": "https://element.io/cookie-policy",
    "map_style_url": "https://api.maptiler.com/maps/streets/style.json?key=fU3vlMsMn4Jb6dnEIFsx",
    "setting_defaults": {
        "RustCrypto.staged_rollout_percent": 60
    },
    "features": {
        "feature_video_rooms": true,
        "feature_group_calls": true,
        "feature_element_call_video_rooms": true
    },
    "element_call": {
        "url": "https://call.element.io"
    }
}- 默认情况下直接全部复制进去就好
其他配置请参考
反向代理
直接用反代docker的通用模版就行。
切换 PostgreSQL 数据库
在 HestiaCP 中,默认情况下 PostgreSQL 数据库的排序规则(collation)是 en_US.UTF-8。然而,当你尝试使用 Synapse 时,可能会遇到以下错误信息:Database has incorrect collation of '%r'. Should be 'C'。这意味着当前的数据库排序规则是 en_US.UTF-8,但 Synapse 需要使用 C 排序规则(也称为 "C locale")。
首先,你需要获取 PostgreSQL 数据库的管理员账户,并通过 phpPgAdmin 登录。然后,在 HestiaCP 中创建的用于 Synapse 的 PostgreSQL 数据库中,登录并删除之前创建的数据库。接着,切换到 PostgreSQL 的管理员账户,重新创建一个新的数据库。

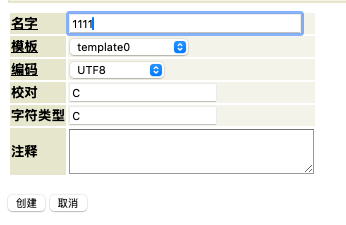
在 phpPgAdmin 的 "创建数据库(Create Database)" 界面中,确保填写以下字段来正确配置数据库的排序规则:
- 名字(Name):
synapse(或需要的名字)。 - 所属用户(Owner):
synapse。 - 编码(Encoding):
UTF-8。 - 校对(Collation):
C。 - 字符类型(Ctype):
C。 - 默认情况下,
template1使用的是en_US.UTF-8排序规则,因此无法直接创建使用C排序规则的新数据库。使用template0来创建数据库。template0是一个干净的模板数据库,没有绑定任何特定的区域设置和排序规则,可以自由指定新的排序规则。

- 点击 Create 按钮。
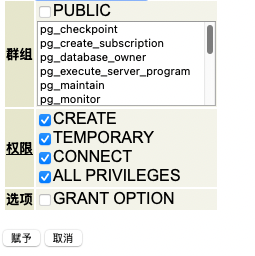
- 然后赋予权限,如图:


